Pages

Wednesday, February 19, 2014

Week Photo #2

vacation 2011 126
I live in Massachusetts and with all the snow I had to shovel and clean in the past few weeks I though I should take a dream break with the flamingoes.
We took this picture a few years back on a very hot day in Florida and I really envy these flamingoes right about now.  Ha!
Be safe and always search for your creative joy,
WonderingMindField

Tangle I Learned this Week

Printemps (Zentangle® Original)
I just recently learned this pattern I think is both easy and cute.  When in doubt about filling in a space throw this baby and magic happens.  It has a outer space feel to it that gives interest and lightness to your art even when the space between the swirls is colored in black.  

CZT Teacher's Guides:
Suzanne McNeil, CZT® illustrated instructions for Printemps, click here and/or also Sandy Steen Bartholomew version of Printemps, here.


The Zentangle® Method is an easy-to-learn, relaxing, and fun way to create beautiful images by drawing structured patterns. It was created by Rick Roberts and Maria Thomas. "Zentangle" is a registered trademark of Zentangle, Inc. Learn more at zentangle.com.


Wednesday, February 12, 2014

Art Journal Page #2

Art Journal: Page 2
by Wonderingmindfield


So I gave this journal thing another try and still need more practice.  I started with some strips of scrap paper glue down with my trusty Mod Podge® glue, then since I did not quite learned from page 1 I added this lace I thought was a good idea for texture, NOT!!   I also spread down some modeling paste, then I added some different acrylic paints.  To give it an old feel to it I used Tim Holtz® Distressed Ink: Antique linen.  I rubbed the page all over to spritz the page with some water to activate the distressed ink for the old look.  I had this nice form body stamp and some flower swirl stamp which I stamped on the page.  I glued this random vellum piece of page I had which had the following quote written on it:
“It is difficult to Imagine anything more nourishing for the soul than family life.” by Sir Thomas More.
To be honest I did not put a lot of thought to this page.  I had a very crappy day at work and was very tired.  I just pretty much took some of my frustration on the page. After I place “the woman in me” phrase on the journal I realized that I felt better emotionally.  The page wasn’t that good but I had been able to for at least an hour forget all my frustrations and let the chaos that is my mind take a breath and calm itself.
That is what I search for every time I do a project; calmness.  I am not an expert or an artist for that matter, but I am a person who needs art to be able to have a better emotional core;  Take care and have a great week
.
Be safe and always look for your creative joy,

WonderingMindField

Monday, February 10, 2014

Zentangle® Tile #2


Here we have another Zentangle® tile I have created in under an hour.  I did this while waiting for my chicken breast with potatoes to cook in the oven.  I'll tell you can be very productive when you cook you entire dinner pretty much in the oven.  Put everything in and set the timer and in the mean time do some cute little art project that does not require too much thinking and very little materials.

The tangles I used in this tile are:


  1. Chillon by Suzanne McNeil, CZT - to visit her website click HERE.
  2. Bubbles 
  3. Printemps - Zentangle® original pattern
  4. Crescent Moon (variation) - Suzanne McNeil, CZT
  5. Fesce - Zentangle® original pattern
  6. Leaf Vine

Tuesday, February 4, 2014

Last Week "My Pages" Recap

Last Week "My Pages" Recap

_________________________________________________________________________________

Art Journal Page 1:

Another interest of mine is Art Journaling and I'm really impressed with some of the ladies (and guys) out there who do this every day.  They're talent reservoir is astronomical and my respect goes out to them.

So here is my first journal:
Art Journal - Page 1
by Consuelo Morales
Now before you think it, yes it is not that good.  I’ll tell you one thing I should have started slowly and not glue everything down until I was sure I liked the layout and texture. I started with the idea that I needed to add texture first and then pait.  So I started gluing things like burlap ribbon, lace and random scrap of papers, but the thing about texture is that I need to know when to say enough.  Mistake #1, not thinking that burlap ribbon was too thick.  The darn thing was bulky and stick out of the page like crazy.  And with the amount of decoupage glue I had to use it is the stiffest page in this journal.

I did try to fix it, because everyone says there is a never a mistake in art just happy accidents (really??? have you met me?)  Anyhow I kept layering paper and then when it could not get any worst I decided to stop and add paint.  Well the first tube I got was a watercolor that did nothing to cover the edge or at least softened the edges from the burlap (mistake #2).  So then I brought out my gouache paint "burnt sienna” and the page just kept getting worst, if that was possible.  After staring at it for some more time I get out this thing called modeling paste (mistake #3).  Annnnd! The mess just got bigger.

I thought "It can get worst so let’s just slap a picture for the sake of distraction and called it Art.  So here it is my first Art Journal Page 1.  So if someone is actually reads this blog, let me know how bad it is!  Thanks!

From a soul looking for inspiration to another, have a Great Day!!!
wonderingmindfield

________________________________________________________________________________

Tangle of the Week:  


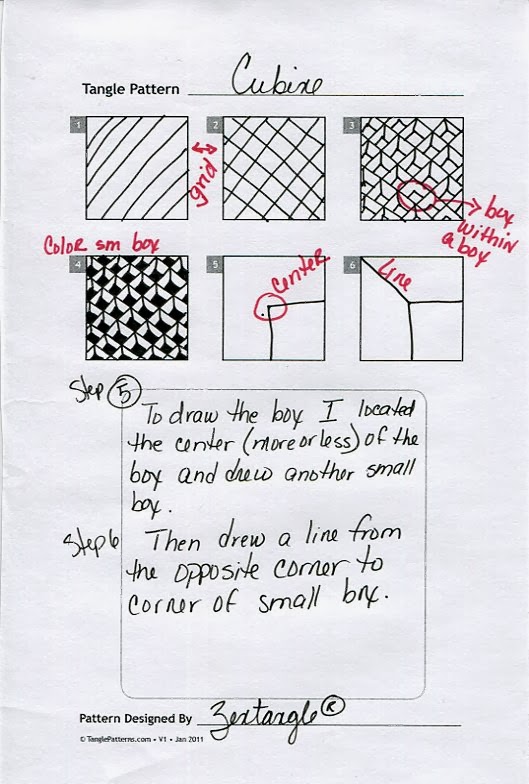
CUBINE (Zentangle® Original)

Here is my practice tangle sheet I drew to practice "Cubine."  The link to Mary Thomas illustrated instructions is HERE.


IMPORTANT
The worksheet I use is copyright property of TanglePattern.com.  Please do not copy or distribute this sheet. This is just an illustration of my practice work.  If you want your own copy go to TanglePatterns.com and download a free .pdf copy of it.  There is even a different version where the grid lines are already in the squares. The link to get your own copy is http://tanglepatterns.com/downloads

________________________________________________________________________________

Zentangle Tile #1


Zentangle® Tile #1
Instructor:  Jean Theurkauf
www.artofthetangle.con


This was my first Zentangle® tile from a class I took a couple of months back.  I really enjoyed the lesson because it was really relaxing and quite.  I do not remember all the names of the tangles used but I really liked doing the "cubine" which is the one on the right bottom corner.  I like the dimension and it is not that difficult to do. It starts with a grid which helps quite a bit.

Another favorite is the one on the opposite corner (left), which is called "hollibaugh" and like "cubine" it is a Zentangle® official tangle.  I have seen many variations of this particular tangle by this one is my favorite.  I'm really obsessed with little bubbles.  The other tangle she taught me was the cut little vine of leaves at the top right hand corner.  I honestly don't remember her telling me a name but I really love them and find myself constantly wanting to draw them on my recent tangles.  They are just so easy and really add an element of life or organic like it is refer to in the Zentagle® language.

The little squiggly which I call worms are a great way to fill in any edges or awkward spaces and they give a bit of whimsy to the tile.  They actually remind me of slime (Ha!) and again I want to apologize to the Zentangle® community that see this for not remembering the names of these great tangles.  If any one that know about Zentangle® know the name please send me a comment to correct my forgetfulness.
One thing I like is that it is encouraged to sign you name by creating your own initials.  I have been practicing and I think I have come up with a signature that pleases me.  The one on this tile was a spur of the moment thought I it looks more like a GM that what my real initials are which are CM.

I am by not a Zentangle® Teacher nor am I affiliated with the Zentangle® Company.  I am just a beginner practicing and loving a form of artistic expression.  For any official information or supplies you should visit Zentangle.com. This is just my way of learning this art form and what I have found that works and doesn't work for me.  I do have the dream of becoming a CZT in the future.  I just want to share by ideas and some of the tools and art I find along the way during this artistic journey. 


From a soul looking for inspiration to another, have a Great Day!!!
wonderingmindfield

Sunday, February 2, 2014

Gelli Arts® Monoprinting Plates

I few months ago I saw this cool YouTube® video where a mixed media artist was using gelli plate to form some pretty cool prints to use on her art journal and I though it was a great tool and set out to look for it on the internet.  To my delight there is a website for it and is called Gelli Arts® (click here for link).  It comes in 4 sizes; 8” Round ($28), 6” by 6” Square ($20), 8” by 10” Square ($30) and 12” by 14” Square Plate ($70).

I really love this product and have been having a messy blast making all kinds of prints.  The web site gives you all the information you need on how to work with this plates and how to take care of it. A few useful tidbits of information:
  • Do not throw away the plastic container it comes in since it is great to store the Gelli Arts® plate in.  I keep mine in the container and hanging on my pegboard in my office/studio. Gelli Arts Plate1
  • Have a good soft rubber brayer to spread the paint on the plate.  I use Speedball® 6” brayer because it covers more surface.  I bought the hard rubber but it left too many lines of paint and I did not like the way the paint spread.  But that is my personal choice it might work better for you.
  • Have in hand a bottle spray filled with water and a roll of paper towels for in between printing cleaning.
  • Use Acrylic paints since they are easier to work with.  I use Reeve’s® brand but many people I have seen use Golden® and I even found that those 2 for $1 acrylic paint bottles work just great because they are thinner and spread on the plate easily. 
  • I clean my plate after I finish using with some mild soap and water and I pat the plate with paper towels.  Don’t use any aggressive cleaners or sponges since the surface of the plate is sensitive to them.  You can end up leaving marks on the plate that will show over and over on any future print you make whether you like or not. 
  • Make sure to read Gelli Arts® Downloadable file on instructions and care.  This way you can get the best of your money and save yourself any aggravations.  The link is http://www.gelliarts.com/pages/what-to-know.
The great thing about it is that you never know what you are going to get exactly until that print is lifted.  When it comes to papers I have found that stock card paper works pretty well.  I have, however used craft paper and a really cool paper to use is Dixie Kabnet Dry Wax Paper (link: HERE) in 12 in by 10 3/4 in. sheets.  I got them at Amazon and it came two boxes for a total of a 1000 sheets.  Imagine a thousand prints!!!  at it was around $25 for the two boxes.  I like using this paper because is can be semi-translucent and it is great to add texture to journal pages.  The paint sticks to it and the prints come out great, it can be torn into pieces and is better than tissue paper, which I do not recommend at all. Messy business! Here are some of my try out results:
Skull PrintWingsWaves
For these I used the deli paper:
Deli Paper Prints
The basic technique is to place you plate on a craft sheet to protect your surface since the Gelli Arts® plates are made of some mineral oil. Then take out your paints and place a small drop of paint (a drop of paint can go a long way) and spread with the brayer.  You can drop a few drops of different colors and spread them to form all kind of interesting combinations. 
Gelli Supplies
To add texture you can use stencils, ribbons, lace, and with just simply a Q-tip® form shapes and texture. The idea is to simply draw a design or texture to print on your paper. I like to use texture plates and once you lay them on the gelli plate they make an impression that then transfers to the paper.  The possibilities are endless.  I found YouTube® and the Gelli Arts® website to have a lot of information and tutorials on how to use these plates which is better than my rambling on. If you can, try it.  You’ll love it, and is really addicting.

From a soul looking for inspiration to another, have a Great Day!!!
wonderingmindfield