Pages

Monday, June 29, 2015

Zentangle Tile #19: TanglePatterns String #003

http://tanglepatterns.com/2012/06/tanglepatterns-string-003.html
Here is a tile I created using the tanglepatterns string #3 Linda Farmer's Tangle Patterns.com has published.  This time I learned from my last tile and decided to only pick 4 patterns and try not to overcrowd the tile too much.

Click on the caption for String 003 and it will take you to TanglePatterns.com.  Give it a try and see what you can create.  The great thing about Zentangle is that there isn't any right or wrong just where your creativity can take you.

Here is my take on string 03.


Since I ran out of Zentangle® official tiles I got an alternative tile I purchased a few months back.  This tiles are acid free and are made by Peter Pauper Press Studio Series Artist’s Tiles.  The are by no means the same quality as the official Zentangle tiles, but in a budget pinch they are not bad to work with, plus they are less than $5.00 at Amazon.

For this tile I used the following tangles:

     Shard – Zentangle® Pattern
     W2 – Suzanne McNeil
     BTL Joos – Sandy Bartholomew
     Merryweather – Sandy Hunter

Have a great day and remember to hug a loved one today for no special reason, just because they are in your life. 


WonderingMindField

Monday, June 15, 2015

Zenspirations #24 (Mini)

Home is where the heart is...the heart is with the ones you love.   

I enjoy making these little houses and adding all the dangles and color.  I wish it was my home for real!  Imagine that!  Here is another drawing from my Zenspirations® Minis!.  As I mentioned in a previous blog I cut squares out of drawing paper scraps and have been doing little drawings.

I used a Sakura® Micron 05 and a Sharpie® fine pen with an assorted brands of gel pens to create this little house. 

A small drawing for a small blog post!  Take care and as always thanks for visiting and hope you have fun with your art.

WonderingMindField

Tuesday, June 9, 2015

DYI Letter and Words Stickers


Ok…I really like incorporating words into my mixed media cards and bookmarks,  I think of them as  little burst of inspiration and encouragement to the ones who receive them.  

My dilemma started when I purchased these cute word stickers by Cosmo Cricket at a Tuesday Morning on discount and liked them so much that I pretty much ran of them.  I could not find the ones I like and except for Tim Holtz I could not find others with words I liked.  So after some random thinking I realized I could just make my own!  Party smile-party time!  This is how I created my own word stickers using few supplies and some old fashion typing.

Supplies: 
  • Computer with Word® or a typing software
  • White cardstock paper
  • Xyron® 1.5” create-a-sticker with a sticker roll
Process:
  1. Open a new Word® document and create a table by going to “insert,” then “table”". In my case I created three columns and 6 rows.  The reason I created the table is because I could print the grid lines and use them as guide to cut and know the correct width of the strip I need and be able to fit them through the Xyron 1.5” create-a-sticker.  I set the width of the rows to 1.3 to give myself some “wiggle” room (that’s a technical word Nyah-Nyah).
  2. I used the “courier new” font in word to give it a typewriter look to the words.  You can certainly use any fonts and word art effect you want.  The idea is to create what you like and depending on what type of sticker machine or medium you have, just make the sizes accordingly.
  3. Once you have typed all the words and/or phrases then print them on white card stock paper, or any other color card stock your little heart desires.
  4. Once printed you can cut the words in strips and run them through the Xyron® of any other sticker machine you have.  Of course, you can just cut and glue, as well!  I like the little Xyron 1.5 create a-sticker because is just the right size for my stickers and take no space.  
  5. Once all my words and phrases were cut out in strips I placed them on a photo storage case (5x7) box to have handy when inspiration strikes.

One thing I wanted to mention is that I printed the words in white card stock with a laser printer.  I tested the sticker with Golden® regular gel (semi-gloss) and the words did not smudge.  I don’t have an inkjet, so I couldn’t test it.  My advise is to print a word or two and them coated with your preferred medium and test smudging.

I hope you are inspired to make your own sticker words.  As always thank you for visiting this corner of my world and have a blessed day!  Rolling on the floor laughing

WonderingMindField

Thursday, June 4, 2015

My Very First: "Pocket Letters"

A little while ago I came across a YouTube video about a cool idea called Pocket Letters.  This was started by Janette Lane.  You can check out some of her videos by clicking on the link attached to her name.

The videos will show how it works and some ideas on how to create one.  The main concept is to fill a 9-pocket trading card protector with goodies and art, instead of baseball cards. FUN!


I liked the idea and decided to just decorate some pieces of paper I have on my paper pile and try a swap.

The first thing you need to do is find people to trade with, so go to the Pocket Letter network and join. They have all the information you need on how to start trading pocket letter as well as the rules of trading.  You can also do your own swaps with friends and family, It would also be a great activity with the kids! Just have them trade handmade cards with their friends or you.

My approach was to join an event.  An event is a one-time or an on going swap that someone in the network has already created.  The creator of the event or swap, states the theme, rules and deadlines for the swap.  I let the creator know how many people I want to swap with as well as, if I want to exchange with someone from the USA, international or both.  Just read all the rules because they contain good information and it will state the last day to sign up for the event and the mailing deadline.  The creator then sends out a listing to the members who join the event with the assigned partners.

This network works a lot like Facebook.  You have a profile page, you can upload pictures, make comments about other member's creations, and even befriend other members.  The big difference is that this site is for the crafty in you not for drama or bad gossip. :) I personally enjoy visiting and wish them all the luck in the success of the site.

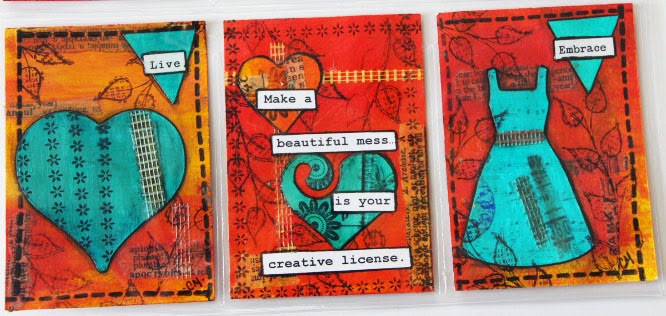
For my pocket letter here are some of the materials I used to create the cards that go into the 9-pockets.

  • Dylusions “over the edge” mini stamps and “Border Clear Stamps” from Oriental Trading.
  • Cut outs:  mini dress and assorted hears sizes and shapes.
  • Colored scraps background, dry wall tape, acrylic paints and washi tape scraps.
  • BCW 9-pocket sleeves.

I liked the way it turned out and hope that my pocket pal does too.  Another thing I wanted to mention is that you’re suppose to fill the pockets with treats and also a letter with a personal message should be included.  I filled the back of this one with washi tape samples, decorated post it notes, handmade stickers, beads, and just assortment of treats, which included a Tazo tea bag. You must include something like tea bags of a small candy, depending on your partners preferences.

If you have tried it or would like to and want more information, leave me a comment.  I will post about the pocket letter I got when I receive it.

Thanks for visiting this corner of my world and have a great day!
WonderingMindField

Closeups:


Monday, June 1, 2015

Zentangle Bookmark #11: “Sea Horse”

Boy! you know you have a problem when you keep putting your art supplies away and then can’t find them for the longest time.  I had this stencil which I got about a year ago and put away for later use; the problem I forgot I even had it!  I don't know smile 

Needless to say I was looking for some printed cardstock I had in some folders and there it was the stencil, among my cardstock.  Well I guess it’s never too late to create.  I always have bookmarks around my craft/office studio, waiting for inspiration to strike and in this instant it was Zentangle®.

Materials:
  • 6 x2 bookmark
  • dictionary page
  • pencil
  • Micron® pen
The only hardship on this piece was trying to do the patterns on such little spaces, but with some shading it worked out well.  This bookmark will make a nice reading companion this week.   I am reading “The Shadows” by JR Ward.  So let the adventure begins.  I love her Black Dagger Brotherhood Series and I hope this one does not disappoint!!

Thanks for visiting and remember that joy can be found in many places!

WonderingMindField